Please leave your contacts, we will send you our whitepaper by email
I consent to process my personal data in order to send personalized marketing materials in accordance with the Privacy Policy. By confirming the submission, you agree to receive marketing materials
Thank you!

The form has been successfully submitted.
Please find further information in your mailbox.

Innowise is an international full-cycle software development company founded in 2007. We are a team of 1600+ IT professionals developing software for other professionals worldwide.
About us
Innowise is an international full-cycle software development company founded in 2007. We are a team of 1600+ IT professionals developing software for other professionals worldwide.

Plan Your Own eCommerce Website Development Step by Step

Today many more entrepreneurs begin to wonder what the process of building an eCommerce website implies and what steps should be taken to develop an eCommerce website. That shouldn’t be a great surprise as online shopping is becoming more and more popular among customers and producers have to adapt to the needs of their customers. So if you have a business and you don’t have a webshop or at least a one-page corporate website, then you’re losing so many clients! If these words made you think, then you should also have a look at the checklist about how to develop an eCommerce site below.

So in order to launch and develop an eCommerce website, you should:

Step 1: Buy a domain name

Actually, that’s quite simple. You would want to have a domain name that would reflect the brand. And don’t think about the process too much. If you go for a site like GoDaddy, then the price for a domain name will probably be less than $10.

Step 2: Choose a web developer

That’s one of the most important elements of launching an eCommerce site. If the time constraints are strict and short, then you have to make a research in order to find a “fine” developer. You should definitely check for the references from the websites which this developer created. You also should have a timeframe they expect to be needed to launch the site. Don’t forget to ask them if they have a graphic design background, because they might need to crop the images to align with your website. And it’s a must to ask about the developer’s experience in making websites using the chosen platform (for more info go to step 4). Sometimes entrepreneurs start off with a developer without proper research of his capabilities. That’s one of the biggest mistakes at this point, as this can be the reason why your website won’t even see the light.

Step 3: Choose the eCommerce platform to host the website

Today the market offers us a significant number of eCommerce platforms which are not that difficult to use. All of these content management systems (CMS) are based on the PHP programming language. Talking about costs — there are platforms that might cost you a penny and there are others whose price is quite reasonable. We provided a list of quite popular tools below:
That’s a most popular eCommerce platform. The explanation here is pretty obvious: if you want to use Shopify, you don’t need to be a software developer to keep your webshop running smoothly. Apart from that, it has numerous features needed to build a scalable online store. Moreover, it allows selling products on Facebook, Amazon and many other social platforms.

The second on our list is Magento, which is used by developers worldwide. In order to give the finest user experience, Magento integrates advertisement, analytics, content creation, etc. Another point that should be mentioned is that Magento is an open-source eCommerce platform, meaning it’s free to download and use.

A large library of Magento extensions also adds to its popularity. Ranging from SEO optimization to advanced analytics tools, they provide users with a rich toolkit for tailoring their e-commerce experience to specific needs and objectives.

WordPress
It’s one of the leading tools, which is also open-source. This platform offers thousands of professional themes. Furthermore, due to a great variety of plugins (which are mostly free), you can install virtually any feature.
Joomla!

Joomla! is said to be a nice choice of platform for a lot of types of websites. Same story here just as with WordPress, you don’t need to pay for Joomla!, as it’s also open-source. So, Joomla! has many plugins, and provides extensions with the help of which you can customize your website’s features.

Of course, you can also choose some other eCommerce platforms such as Drupal, WooCommerce, Weebly, etc. but we stopped on the most popular ones. At this point, you are likely to face such a problem as which platform to stop on. Well, usually, the major part of developers knows how to work on these platforms, how to integrate plugins, payment processing, and so on. So concentrate on the purpose of your webshop, and as soon as you have defined it, it’ll be less trouble to find “just the one”.

 Magnolia

Magnolia CMS is a powerful platform that offers users intuitive interfaces to quickly manage their sites with integrated editors and drag-and-drop tools. This user-friendly system can help deliver a better customer experience with fast, reliable website performance on any device or browser. Additionally, Magnolia CMS’s customizable capabilities make it an impressive solution for businesses of any size within any industry. From large enterprises to small startups, Magnolia CMS is a great choice for content management needs.

Step 4: Select a theme which lives up to the chosen eCommerce vision

If you are willing to spend even less time, there’s an option to help you: for example, you can buy a theme from some provider like ThemeForest, where you might find a layout that will match your idea from an eCommerce perspective. There are more than 28,000 templates of websites on ThemeForest and the costs for the themes don’t bite: the prices start from $2. That’s number one in the market for websites.

In this case, there’s absolutely no need to be extraordinary or try to stand out of the crowd, just download a template and don’t make the developer build everything from scratch because there’s no great necessity to do this way, and giving this task to your hired developer, won’t save your money or time. Moreover, it can take ages to customize something and in the end, you might be really disappointed by the outcome. Our advice — don’t create additional problems yourself and just decide on some theme.

Step 5: Design your Webshop and Add Products

That’s another important point on our eCommerce website checklist. At this stage, you are to mull over what else you’d want to see on the website apart from the list of products. You really need to make a homepage, “About Us” page plus a contact page (of course you are not expected to do that yourself, that’s the task for your developer). Plus text and video content are really appreciated by the customers.

During the development of your eCommerce website, it’ll be great if you:

1) Add a picture of you. In this way, customers feel some personal approach as they will be dealing with someone real.
2) Include the name of your store. Usually, the developers add your account name, however, in case you decide that you’d like something different, that’s not a problem.
3) Don’t forget to add your logo, as this will do good for the branding and recognition.
4) Include the payment logos and trustmarks (that is an electronic commerce badge, image or logo displayed on a website to indicate that the website business has been shown to be trustworthy by the issuing organization). They are the sign to the clients that it’s secure to deal with you.

Be sure to make the categories which will make sense to the customers. You need to find out as much information about your perfect client as possible and take this information into account while creating a UI which they’ll find perfect.

Bear in mind that your opinion about your clients can be different from their perception of themselves, that’s why if you manage to come up with a way to gather their thoughts while you are developing your eCommerce website, that would be marvelous.

As soon as you have done with the website design, it’s high time you added your products. In Innowise we do the following way:

1) You need to select the type of your product: it can be some service, or material or digital.
2) You have to choose a name for your product and describe it.
3) You need to establish the price and the amount which is to be sold.
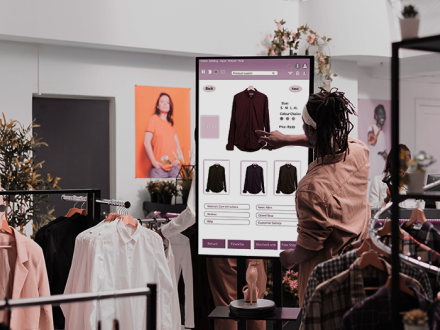
4) You have to make a preview of your products. You can do it in several ways, depending on the type of your product: just upload a photo/video file or a video preview.
5) Another important aspect is to make a choice regarding delivery and pricing alternatives.

Of course, you might want to speed up the whole procedure, however, remember that the better your design and product descriptions are, the more likely is their conversion. You should also be careful and concise as far as the copywriting goes and make the images look beautiful.

Step 6: Make the Checkout process user-friendly

You might know that in fact, cart abandonment is one of the most disappointing things about online sales. By the way, cart abandonment means that you had a potential customer who was on your website page but left before fulfilling the expected from action them, for example, they added several items to their cart and then leave the site without making a purchase. If you are wondering about the statistics, the Baymard Institute calculated an average of 41 different studies about eCommerce shopping cart abandonment, and the result is 69.57%!

However, there’s no much need for panicking, any problem can be solved. Below you may find a list of what we advise to prevent cart abandonment from a webshop:

1) Ensure the clients can buy not just one, but several items at a time from your store.
2) If possible — provide your customers with free shipping. If not — go to point 3).
3) Provide your buyers with the information about the prices for shipping before they get to the checkout procedure.
4) Don’t forget to optimize the checkout process for all types of devices, not only for the desktop but for the smartphone and tablet.
5) Make the settings that would send your customer an email whenever he/she leaves the website before finishing their purchase.

Bear in mind that your time and effort devoted to going through all these steps will considerably influence how well your sales conversion rate grow. You should also properly test the checking out process and ensure that it’s ideal.

Step 7: Obtain a payment gateway

Not that many people think about how the payment processes with credit cards are conducted on online stores. Still, that’s another important stage while creating their eCommerce website. So, the payments are accepted through a payment gateway plus a credit card processor. The most popular names for you will probably be PayPal and Amazon Payments. Therefore, these two are not the only gateways, you might also want to check 2CheckoutDueDwollaPayStand, as they offer a wide range of possibilities.

Talking about the procedure of obtaining the approval for a payment gateway and credit card processor, you should know that it’s rather complicated, however, not impossible, all that is needed from you is to conduct careful research and thorough preparation. There are several actions you need to make before the application. Firstly, you’ll need to establish a safe checkout procedure. Secondly, make a Privacy Policy and Return Policy. Thirdly, identify the shipment and delivery procedures. Finally, ensure to have a functioning customer care. The most popular ways to arrange customer care is to create a phone number and an email address so that your customers had a couple of alternatives about how to reach out to you. It goes without saying that all these details must be found on the website.

We can’t but mention that the setup procedures of payment gateway and credit card processing are quite time-consuming. Not all the processor companies are ready to take risks on inexperienced entrepreneurs, so you are to convince them that your business can be trusted. Taking all this into account, there’s a quite obvious conclusion coming: you shouldn’t postpone all these processes till the very last second.

Step 8: Test your webshop and publish afterward

Thank you for rating!
Thank you for comment!
Your final stage should be website testing, and as soon as you make sure that all the parts of your website are running smoothly – then it’s the right time to publish your eCommerce website. The 2 things you should pay extra attention to while testing are the website functionality and the checkout process, so take good care of that.

Final words

It’s not that easy to create your own webshop, it’s rather time-consuming plus it demands a certain level of investigation. However, that will pay off. We created this check-list in order to guide you on your path to creating your own webshop. Make sure that everything has been done as it should, and enjoy the results! If you doubt that you can do everything right, let us have the work done for you and contact us.

Table of contents

Rate this article:

4/5

4.9/5 (42 reviews)

Related content

Brought us a challenge?

    Please include project details, duration, tech stack, IT professionals needed, and other relevant info
    Record a voice message about your
    project to help us understand it better
    Attach additional documents as needed
    Upload file

    You can attach up to 1 file of 2MB overall. Valid files: pdf, jpg, jpeg, png

    Please be informed that when you click the Send button Innowise will process your personal data in accordance with our Privacy Policy for the purpose of providing you with appropriate information.

    What happens next?

    1

    Having received and processed your request, we will get back to you shortly to detail your project needs and sign an NDA to ensure the confidentiality of information.

    2

    After examining requirements, our analysts and developers devise a project proposal with the scope of works, team size, time, and cost estimates.

    3

    We arrange a meeting with you to discuss the offer and come to an agreement.

    4

    We sign a contract and start working on your project as quickly as possible.

    Thank you!

    Your message has been sent.
    We’ll process your request and contact you back as soon as possible.

    Thank you!

    Your message has been sent.
    We’ll process your request and contact you back as soon as possible.

    arrow